2018
Build a Beautiful Platform Deck at a Weekend
There aren’t many things better than partying down with family and friends, but our small home’s current design is not ideal for hosting even 1 individual — let alone an entire bunch. While our interior is highly lacking in the area category, our exterior is more than adequate. With summer finally here, we started scheming our initial outdoor gathering.
But those festive dreams were quickly shattered once we took you step out the back door and realized our backyard wasn’t the outside area my husband and I would be pleased to show off. We’d taken small steps to improve our outside space with the addition of a budget-friendly pathway and dangling shelves onto our lackluster fence, but neither of these could take away attention from the eyesore outside our entry — a bare piece of ground that just cried, “Where is the deck?” With that in mind, we set out to educate ourselves how to build a deck. Here’s what we learned.
Meg Padgett
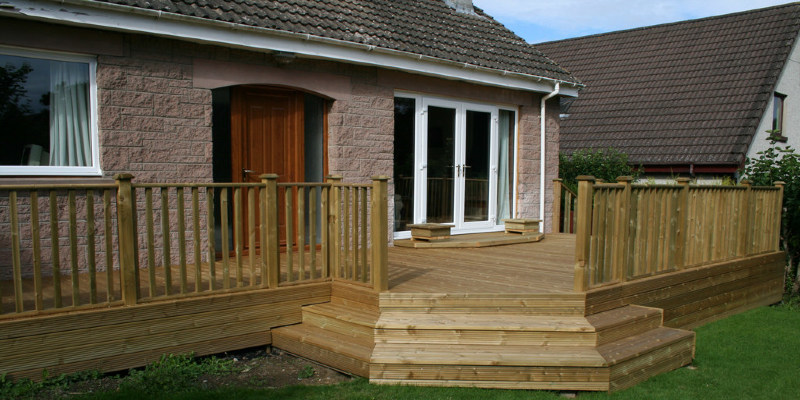
With a couple of days to spare and some help from our loved ones, we assembled a stage deck and turned on that bare floor into a gorgeous space big enough to entertain on.
Whether you have a blank slate, such as us, or your existing deck or deck has seen better days, building this very simple platform deck is easier than you think and could be done in a brief amount of time, if you do it yourself or hire a contractor to build it for you.
Before beginning, check your regional building department for virtually any size, height or fundamental construction restrictions or permits required for building your deck.
Materials
here is what you want to build a very simple backyard deck (amounts will vary depending on how big your deck):
Circular sawDrillPier blocksMetal flashing2-by-6 pressure-treated boards 4-by-4 pressure-treated posts2-by-6 cedar decking31/2-inch lag screwsRustproof deck screwsMeasuring tapeLevelWeatherproofing wood stainCaulkNext, layout your deck. Assess the deck’s measurements, map it out and take into account any features of the home you’ll need to work around. Using a good strategy will save you both money and time, and a little peace of mind.
We designed ours to be 20 feet long by 12 feet broad, an attached terrace having an angled corner at the same end.
Meg Padgett
With your measurements set and materials purchased, remove the siding at which you will put in a ledger board. Attach the ledger board the entire length of your deck into the walls of your residence. We set up a 2-by-6 pressure-treated plank with 31/2-inch lag screws to the beam. Utilize a 3-foot level to be sure the board is flat.
To guard the ledger and your home from water damage, put in a drip edge by slipping metal flashing beneath the lip of the siding and bending the opposite end over the side of the ledger board using a scrap piece of wood. Seal the top seam where the siding and flashing meet with caulking.
Meg Padgett
To build our 20- by 12-foot deck foundation, we planned to your 4-by-4 support beams to be placed parallel to the ledger board at 51/2 feet and 11 feet in the home. Distances will vary depending on the specific size of this deck.
To place the supports, then measure your preferred distance to your very first support beam and place all pier blocks. Both your support beams and pier blocks should be no more than 6 feet apart.
Dig square holes with ample area for alteration for your pier blocks. Have gravel on hand to place beneath the pier blocks. The gravel helps to provide a stable foundation and wards off erosion under the dock blocks.
Notice: Consult your regional building code to determine any regulations on the distance between support beams.
Meg Padgett
Once you’ve your pier blocks set up and have added your support beams, fix both till they are parallel and at the desired height. Ensure your support beams are flat. Break a joist on the support beam perpendicular to and flush with the top of the ledger board. Use a level to determine your preferred slope.
Before you attach the support beams into the pier blocks, use a joist flush with the end of the ledger, measure 6 feet in on the ledger in the inside of the plank and 8 feet in the inside of the ledger across the joist. When these two marks are 10 feet apart, the joist is perpendicular. Ensure that the ends of your support beams are flush with the exterior of this joist.
Once you have both pier blocks and encourage beams in your preferred location, secure the pier blocks to the support beams with deck screws. We opted to utilize DeckMate deck screws to decrease corrosion from our area’s salty ocean air.
Arguments have been made for both flat decks and slight slopes to ward off water. We built ours to have a very slight incline of 1/2 inch over a 12-foot span.
Notice: this portion of the process has become easily the most important and time consuming. Attention to detail and precision are crucial to creating the rest of the measures go smoothly.
Meg Padgett
To attach the floor joists, utilize standard face-mounting joist hangers to totally secure the floor joists into the ledger board with deck screws. Ensure you don’t puncture the flashing when attaching the floor joists.
Typically, floor joists for a deck this size should be placed 16 inches on center. Adjustments on the end joists may be needed depending on your deck’s specific length.
Next, mark the rim joist each 16 inches. Set the end of the rim joist flush with the finish of this first mounted floor joist, flush with the top and centered on every mark to the additional floor joists, and attach with three deck screws on each floor joist finish.
Meg Padgett
Toenail each side of the floor joists to the support beams. Use a tape measure to guarantee they are 16 inches on center.
Meg Padgett
We needed to angle one side of our deck to permit for gate clearance and adequate distance to walk. To determine the correct angle, the two math teachers on the group employed trigonometry.
Trig not something? Another alternative to locating the angle is to place the board flush with the endings to be trimmed and mark the angle from beneath.
Or keep it simple and bypass the angled side completely.
Meg Padgett
With the foundation secure, attach the bamboo decking into the floor joists using 2 deck screws. Each screw should be countersunk to the board to prevent a tripping hazard.
Utilize a 16d nail to make a uniform gap between each plank, which will help the deck shed water.
It helps to have two or three people at this stage — you to distance and one to twist. Additionally, a shovel dug into the floor is useful for leveraging a warped plank directly.
Tip: Inspect both sides of the plank for defects. Twist the board with its very best side up.
To get a more finished appearance, consider filling the screw holes with stainable wood filler.
Meg Padgett
Next, cut the overhang using a circular saw.
Meg Padgett
Our decking has been a mix of new boards and elderly unused planks that had been stored outside, therefore a good cleanup was in order.
Meg Padgett
We opted to give the elderly boards a fast sanding to get rid of any water stains that had accumulated.
Another cleaning alternative is washing the deck using a mixture of 6 parts water and one part bleach.
Want the look of wood but without maintenance? There are excellent recycled-content composite decking alternatives out there, such as MoistureShield, which uses 95 percent total recycled content.
Meg Padgett
It is crucial to make sure you have a clean surface before staining. So, once we were finished sanding, we sailed and wiped down the decking to remove any sanding dust.
Then we checked out the weather report and made sure we had a couple of days of sunny weather, and applied two coats of weatherproofing stain to the top and sides of the deck. We picked Behr Premium Semi-Transparent Weatherproofing Wood Stain at Cordovan Brown.
Meg Padgett
Before applying the first coat of stain, browse all recommendations on the blot’s label and note the drying period, taking into account any weather that could hinder your attempts at sealing the deck.
Meg Padgett
I used my brand new room to make a cozy outdoor seating area with an outside carpet, a patio set and floor cushions.
Meg Padgett
Accessorize with evergreen perennials and glass lanterns for texture and color.
Meg Padgett
Don’t forget to protect your deck from long-term water harm by placing planting pots on a tray that is protective!
More:
Contractor Tips: Construct a Top-Notch Deck
20 Tools Every Homeowner Should Have
More great ideas for decks